
Forging Systems. Building Skill.
🔹 Summary
“Project OSmith – As an IT technician specializing in both hardware and software, I encountered limitations while attempting to perform diagnostic tests on a Windows environment using my MacBook Air M2. Due to its ARM-based architecture, Windows installation required ARM-specific ISO images, which restricted access to the full-featured x86 version of Windows. To overcome this, I decided to build a custom PC tailored for native Windows support and technician-level hands-on work.

While cloud-based solutions like Azure VMs were viable alternatives, I deliberately chose a physical build to gain practical experience with hardware assembly, BIOS configuration, and system optimization. I sourced all required components from Amazon, assembled the system, configured the BIOS settings, and successfully installed a standard x86 Windows ISO.
The CPU selected was the AMD Ryzen 5 5600G, a 6-core APU with integrated Radeon graphics. This choice was strategic as it offered both strong multi-core performance for virtualization tasks and eliminated the need for a discrete GPU, which is commonly absent in budget Intel CPUs. The system was paired with 32GB of RAM, ensuring ample headroom for nested virtualization setups using hypervisors like VMware or VirtualBox. I reused an existing Dell monitor and added a new keyboard and mouse to complete the setup.
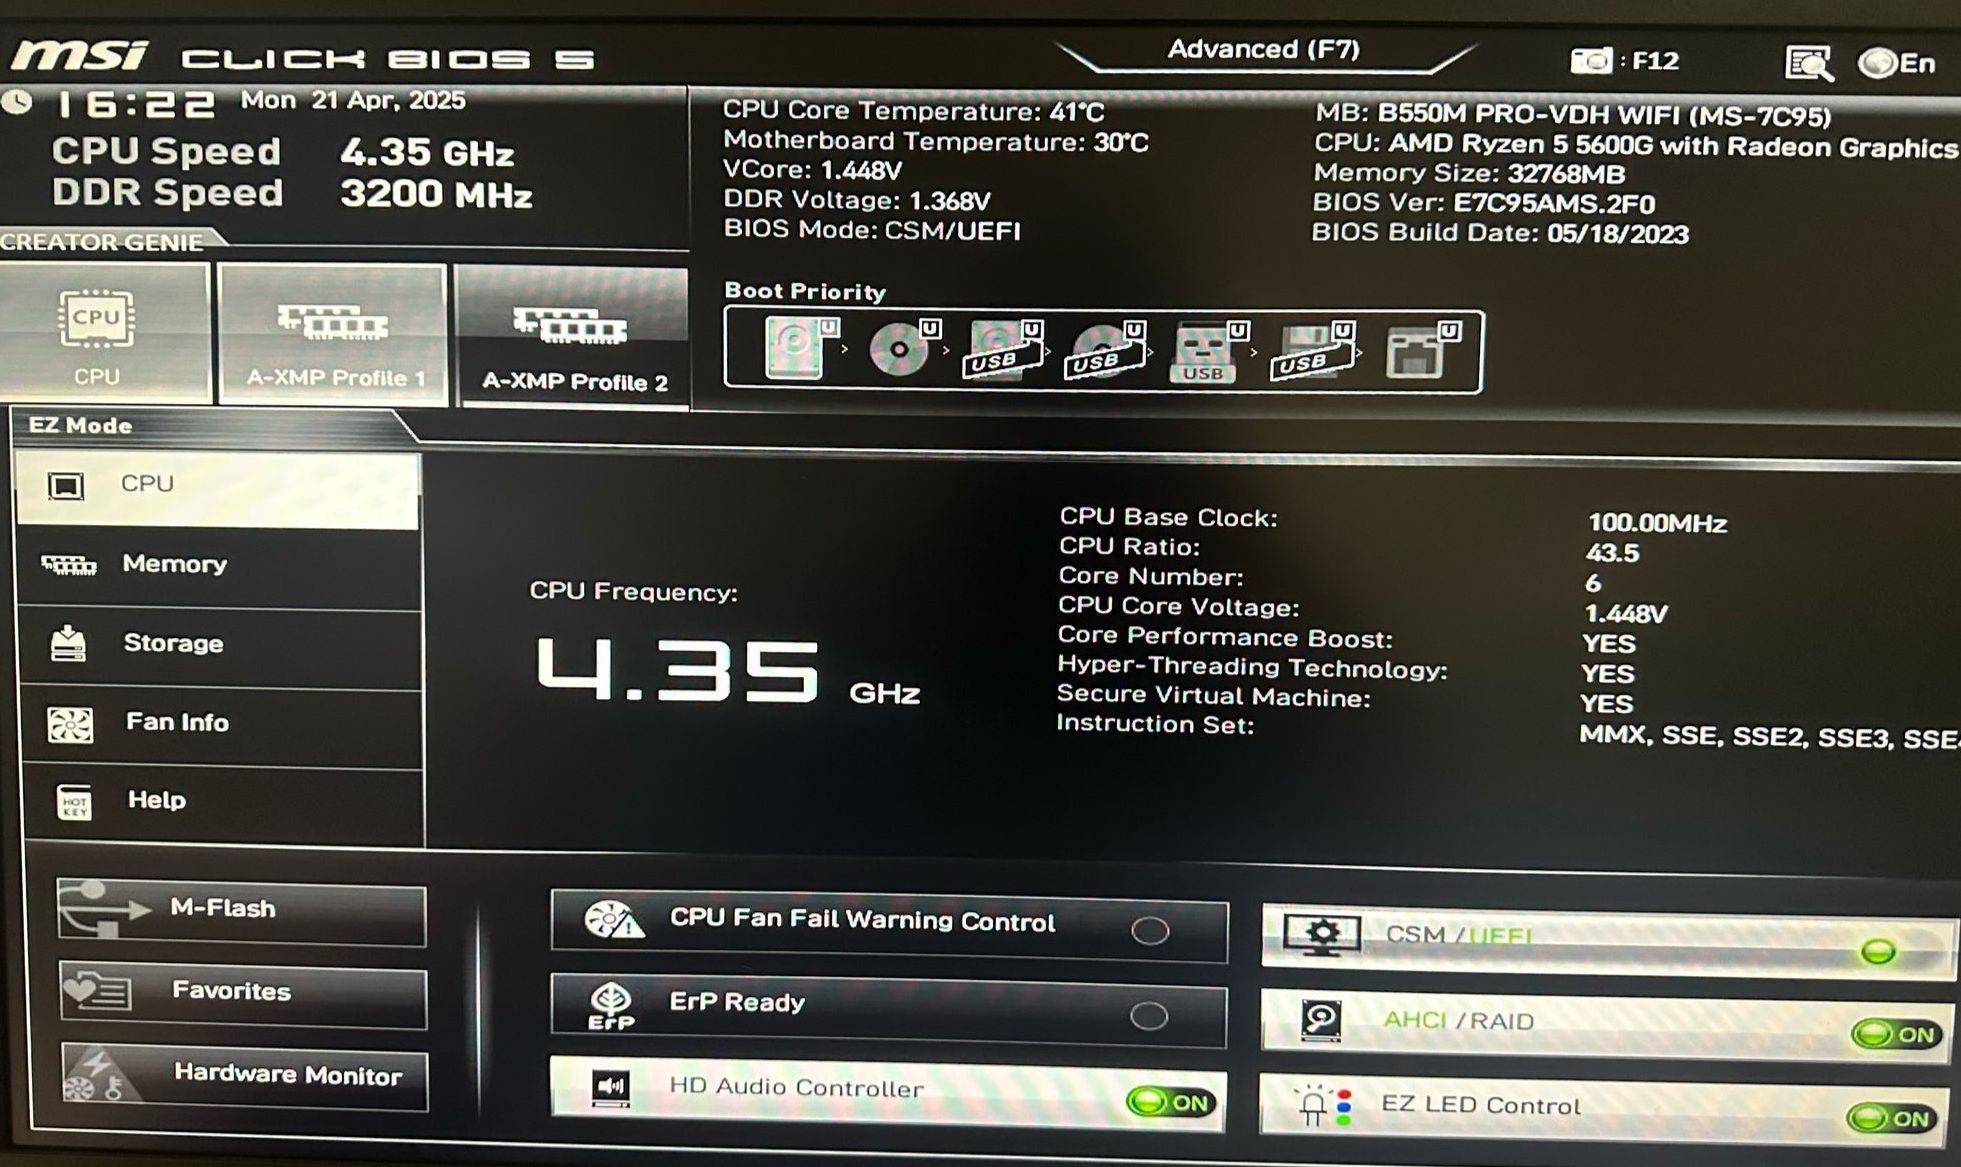
Given the requirement of TPM 2.0 for Windows 11, I ensured the selected motherboard was compliant and enabled TPM features during BIOS configuration. I also activated the A-XMP (AMD Extreme Memory Profile) to unlock maximum supported RAM speeds, optimizing system performance beyond default memory settings.
In future phases, this build (Project OSmith) will serve as a platform to test nested virtualization environments, including Linux distributions such as Ubuntu and Kali Linux, with a focus on technician-level diagnostics, OS deployment, and security hardening.
🔹 Project Overview
Phase -1
OSmith is an ongoing personal initiative designed to deepen hands-on expertise in hardware assembly, software deployment, and systems configuration. Motivated by limitations of ARM-based virtualization on my primary device (MacBook Air M2), I launched OSmith to build a versatile, performance-oriented secondary PC. This platform enables unrestricted exploration and mastery of full-featured operating systems, virtualization setups, and technical diagnostics.

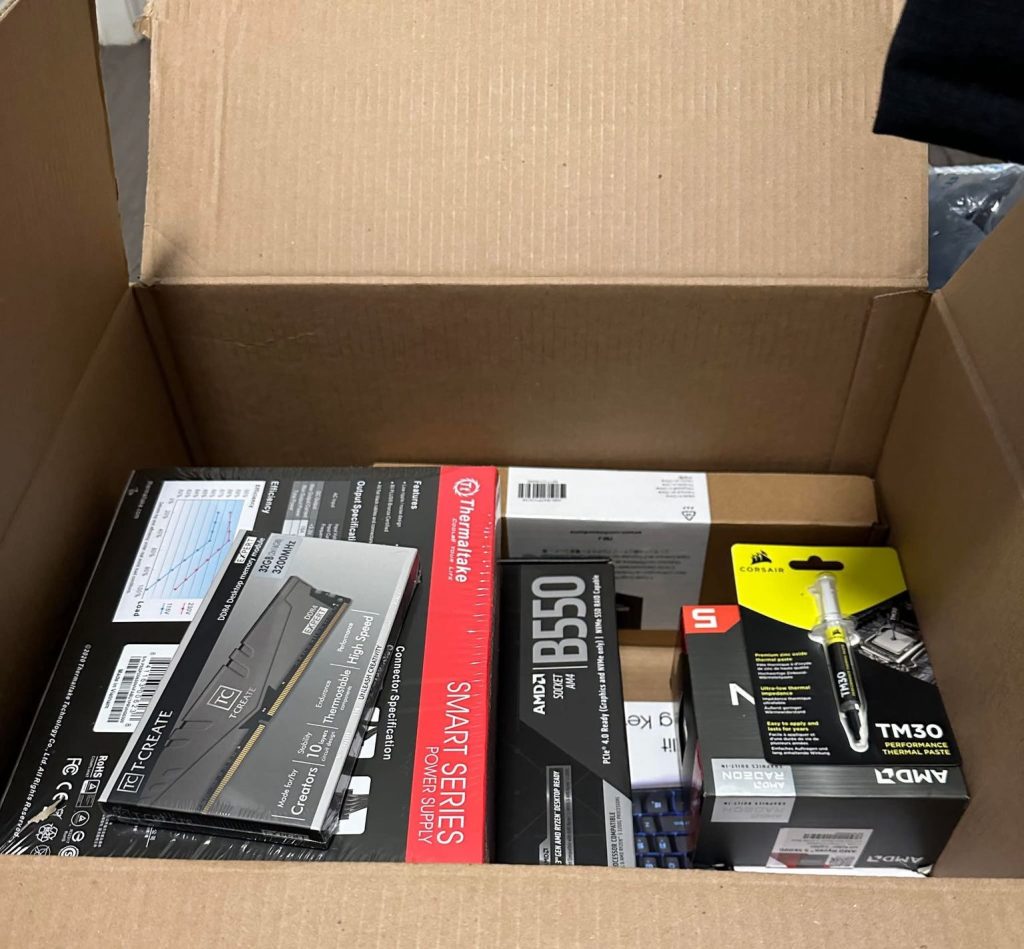
🔹 Hardware Specifications
- Processor: AMD Ryzen 5 5600G (6 cores, 12 threads, 4.4 GHz)
- Motherboard: MSI B550M PRO-VDH WiFi ProSeries (PCIe 4.0, M.2 support, Wi-Fi 6)
- RAM: TEAMGROUP T-Create Expert 32GB DDR4 3200MHz CL16
- Storage: Timetec 512GB SSD M.2 SATA III 3D NAND
- Power Supply: Thermaltake Smart BX1 650W 80+ Bronze
- Case: Thermaltake Tempered Glass Micro ATX Gaming Case
- Thermal Paste: Corsair TM30 Performance Thermal Paste
- Accessories: Amazon Basics 6-Outlet Surge Protector (790 Joule)
🔹 Software and Configuration
The B550M motherboard was optimized by enabling the A-XMP (Extreme Memory Profile) to allow the RAM to operate at its maximum supported frequency, ensuring peak memory performance. Additionally, TPM 2.0 (Trusted Platform Module) was activated in the BIOS to meet the Windows 11 security and compatibility requirements, enabling secure boot and system integrity features.
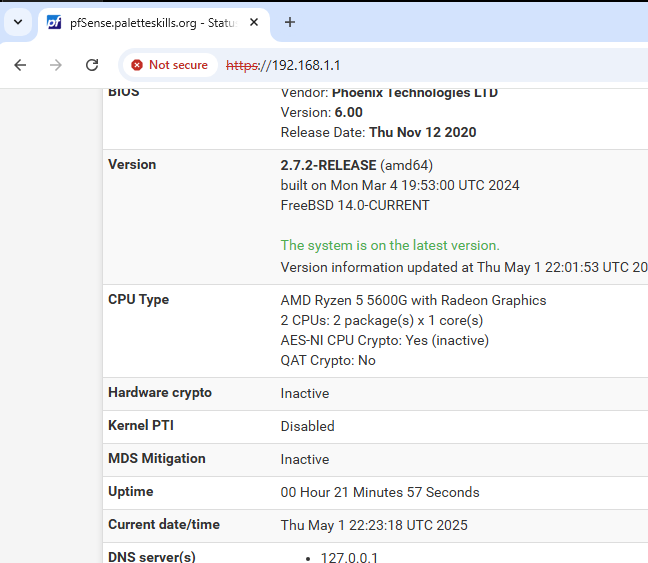
A clean installation of Windows 11 Home, version 24H2, was successfully performed on the system, ensuring a fresh, bloatware-free environment optimized for diagnostics and virtualization tasks. The system specifications and OS details are displayed in the About section below.

🔹 Update on Phase – 1
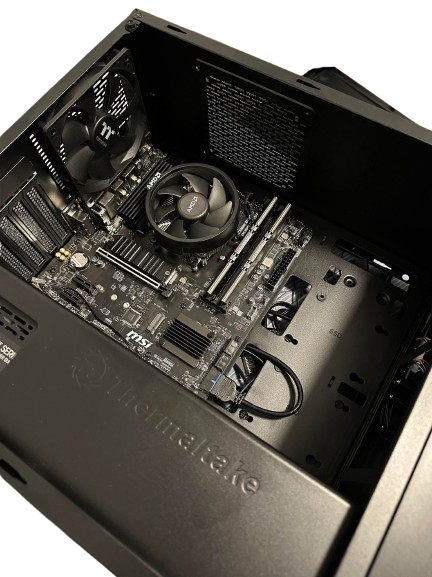
✅ Hardware Assembly & Troubleshooting
Successfully assembled the custom PC using AMD Ryzen architecture, ensuring proper connectivity, power delivery, and thermal management. All components were tested and validated post-installation.
✅ System-Level Diagnostics
Performed initial diagnostics to verify CPU, memory, and storage health using built-in and third-party tools, ensuring hardware stability prior to OS deployment.
✅ BIOS/UEFI Configuration
Configured the B550M motherboard’s firmware with critical settings including A-XMP profile for memory optimization and TPM 2.0 enablement for Windows 11 compatibility.
✅ Operating System Installation & Optimization
Completed a clean installation of Windows 11 Home (24H2), followed by post-install optimization for performance, responsiveness, and baseline security.
🔄 Virtualization Setup (Planned in Phase 2)
Deployment of nested virtualization environments using VMware Workstation or Hyper-V for Linux distributions such as Ubuntu and Kali Linux.
🔄 Security Configuration & Performance Benchmarking (Planned in Phase 2)
Configuration of Windows Defender, BitLocker, Secure Boot, and execution of performance benchmarks to evaluate system readiness for technician-level workloads.
🔄 Project OSmith – Phase 2 Finalized
Objective: Simulate an enterprise network with firewall enforcement, selective access control, and device-level policies using virtual infrastructure.
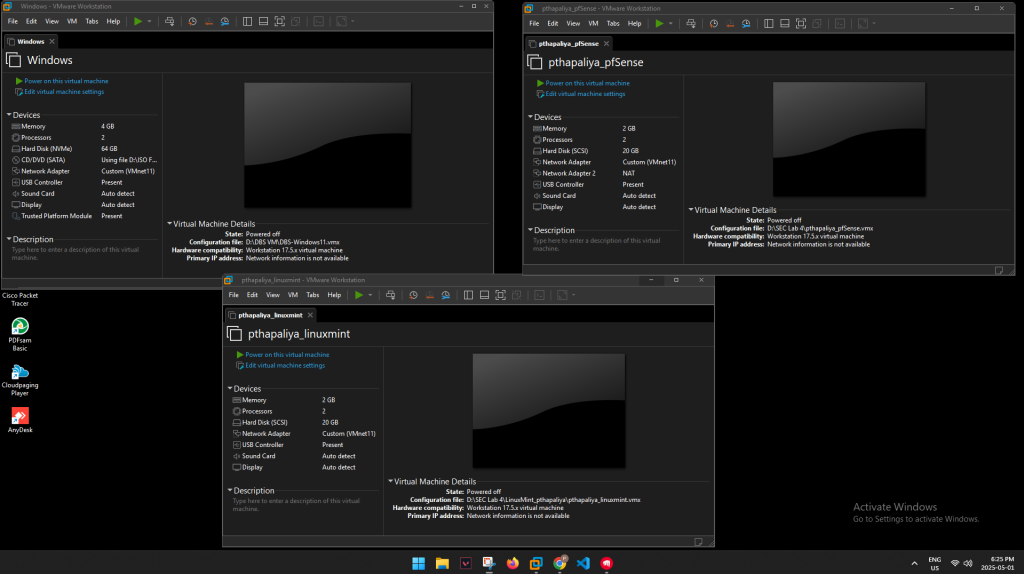
🖥️ Windows, Linux, and pfSense Setup (VMware Workstation)
Three virtual machines were deployed on VMware Workstation using Custom (VMnet11) networking to simulate a real-world internal LAN:
- 🛡️ pfSense (v2.7.2): Acts as the virtual firewall and DHCP server
- 🧊 Windows 11 VM: Standard client workstation
- 🐧 Linux Mint VM: Represents an admin/test machine
All VMs were connected to the same internal network (VMnet11), with pfSense managing IP allocation (192.168.1.0/24) and traffic routing.
🛠️ pfSense Setup
Admin Access: WebConfigurator accessed via LAN IP https://192.168.1.1 from client VMs
Interface Configuration:
- WAN: Connected to NAT for external internet
- LAN: Connected to
VMnet11(192.168.1.1/24)
Services Enabled:
- DHCP server for LAN
- DNS Resolver for local hostname resolution and overrides
🔒 Blocking ChatGPT on All Devices
Initial Test:
- Both Windows and Linux machines could access
https://chat.openai.com
Blocking Setup:
- A Firewall Rules on LAN was configured
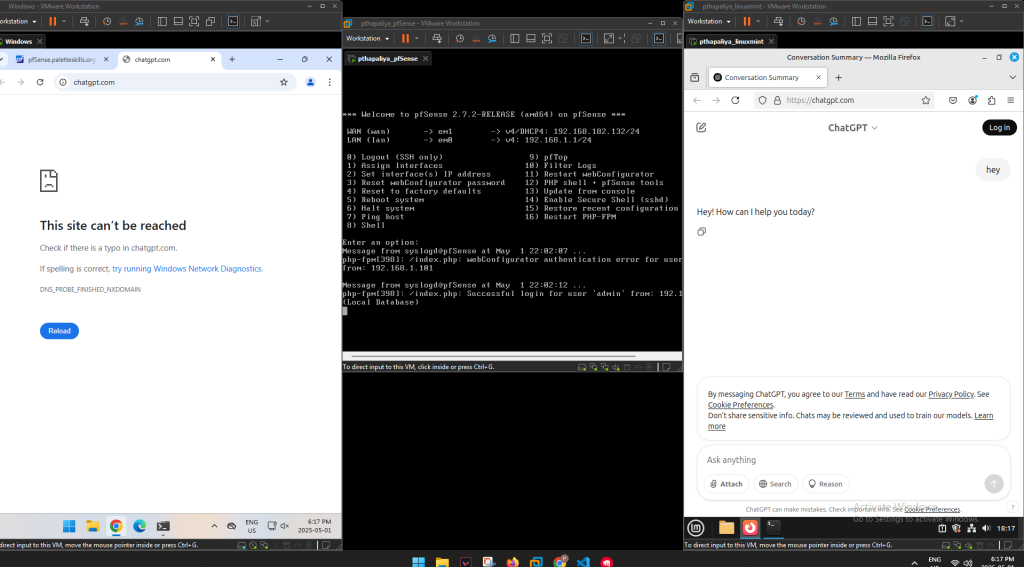
Result:
Both Windows and Linux received “Site can’t be reached” or “Server not found” errors when accessing ChatGPT.

🔄 Conditional Blocking: Windows Blocked, Ubuntu Allowed
Use Case:
Demonstrate pfSense’s capability to apply firewall rules selectively per host/device.
Steps:
- 🔁 Static IP Reservation (Optional):
- Linux Mint was assigned IP
- Windows retained IP via DHCP
- 📁 Created Firewall Aliases:
Ubuntu_Allow: IP addressBlock_ChatGPTs: FQDNchat.openai.com
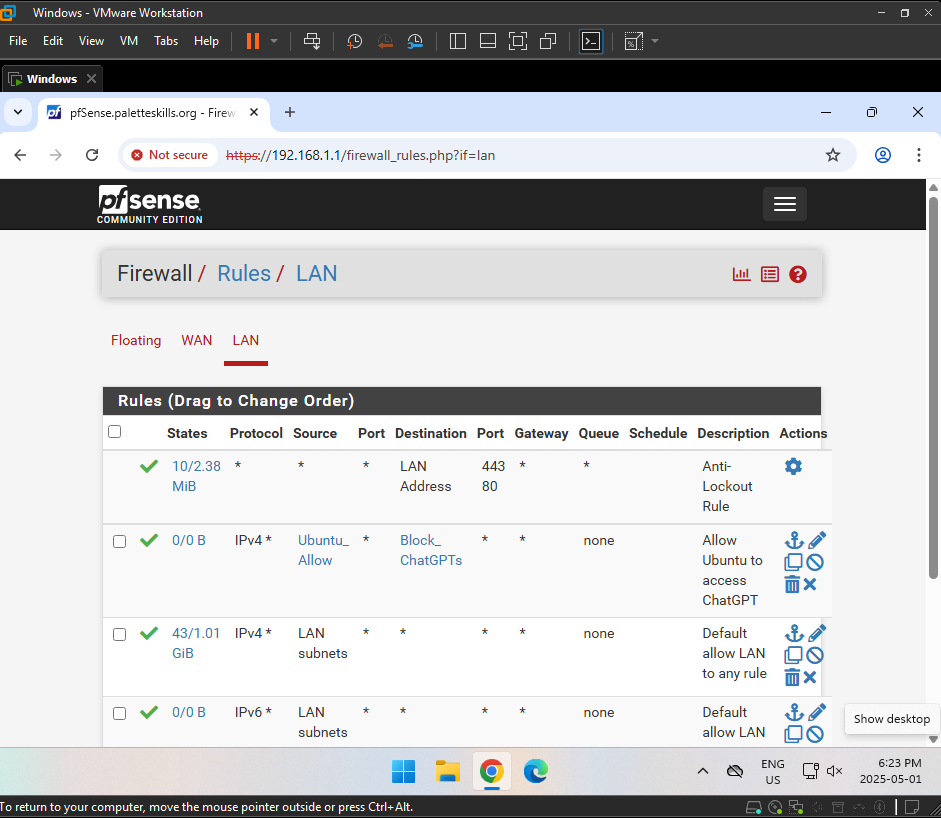
- 📋 Configured LAN Firewall Rules:
- Rule 1: Allow
Ubuntu_Allow→Block_ChatGPTs - Rule 2: Block
LAN subnet→Block_ChatGPTs(catches everyone else) - Rule order was critical: allow rule placed above block rule
- Rule 1: Allow
Result:
❌ Windows continued to fail DNS resolution or reach the site.
✅ Ubuntu could access and log into ChatGPT normally.
📡 Connectivity Tests (Ping & Traceroute)
ping: Verified client connectivity to pfSense
✅ Phase 2 Achievements
- 🔧 Configured virtual LAN with DHCP, DNS, and firewall segmentation
- 🔒 Enforced domain-based filtering at gateway level
- 🎯 Demonstrated policy-based access per device using aliases and firewall rules
- 📶 Proved packet flow and DNS behavior using CLI tests and browser validation
🧰 Tech Stack & Skills Gained
🔧 Virtualization & System Setup
- VMware Workstation Pro – Created and managed isolated virtual environments
- Custom VMnet (Host-Only Networking) – Designed a virtual LAN for cross-platform communication
- Linux Mint (Ubuntu-based) – Configured system networking, tested routing and firewall behavior
- Windows 11 – Used for client testing and DNS/HTTPS access simulation
🔐 Firewall & Networking
- pfSense 2.7.2 (Firewall/Router)
- LAN/WAN interface configuration
- DHCP server setup for virtual clients
- DNS Resolver configuration and Host Overrides
- Domain-level traffic filtering using aliases
- Device-specific rule enforcement using ordered firewall rules
- Access control through IP and FQDN-based blocking
🌐 Network Security Concepts
- Policy-based Access Control – Blocked ChatGPT selectively for devices using layered firewall rules
- DNS Blackhole Filtering – Redirected ChatGPT DNS requests to null IPs
- Rule Testing & Verification – Used tools like
ping,nslookup, browser diagnostics to verify rule effectiveness - System Hardening – Isolated clients from WAN via controlled gateway rules
🧪 Diagnostics & Command-line Tools
ping,ip a,traceroute,dig,nslookup– Validated internal routing, name resolution, and firewall behavior- Browser-based DNS failure validation – Demonstrated enforcement of DNS overrides
📖 Soft Skills & Project Execution
- Lab Documentation – Captured setup, outputs, screenshots, and failures for reporting
- Structured Testing – Performed before/after validation with multiple OSes
- Problem Solving – Handled login issues, DNS failures, IP conflicts, and VM sync challenges
🏁 Summary
“This project demonstrated my ability to build, secure, and manage a cross-platform virtual network using pfSense, Linux, and Windows in a structured, test-driven lab environment. It reflects real-world enterprise firewall concepts and hands-on troubleshooting skills.”
I was looking for a guide for my assignment and saw this post. Thank you so much. I really appreciate the effort you put into this. ❤️